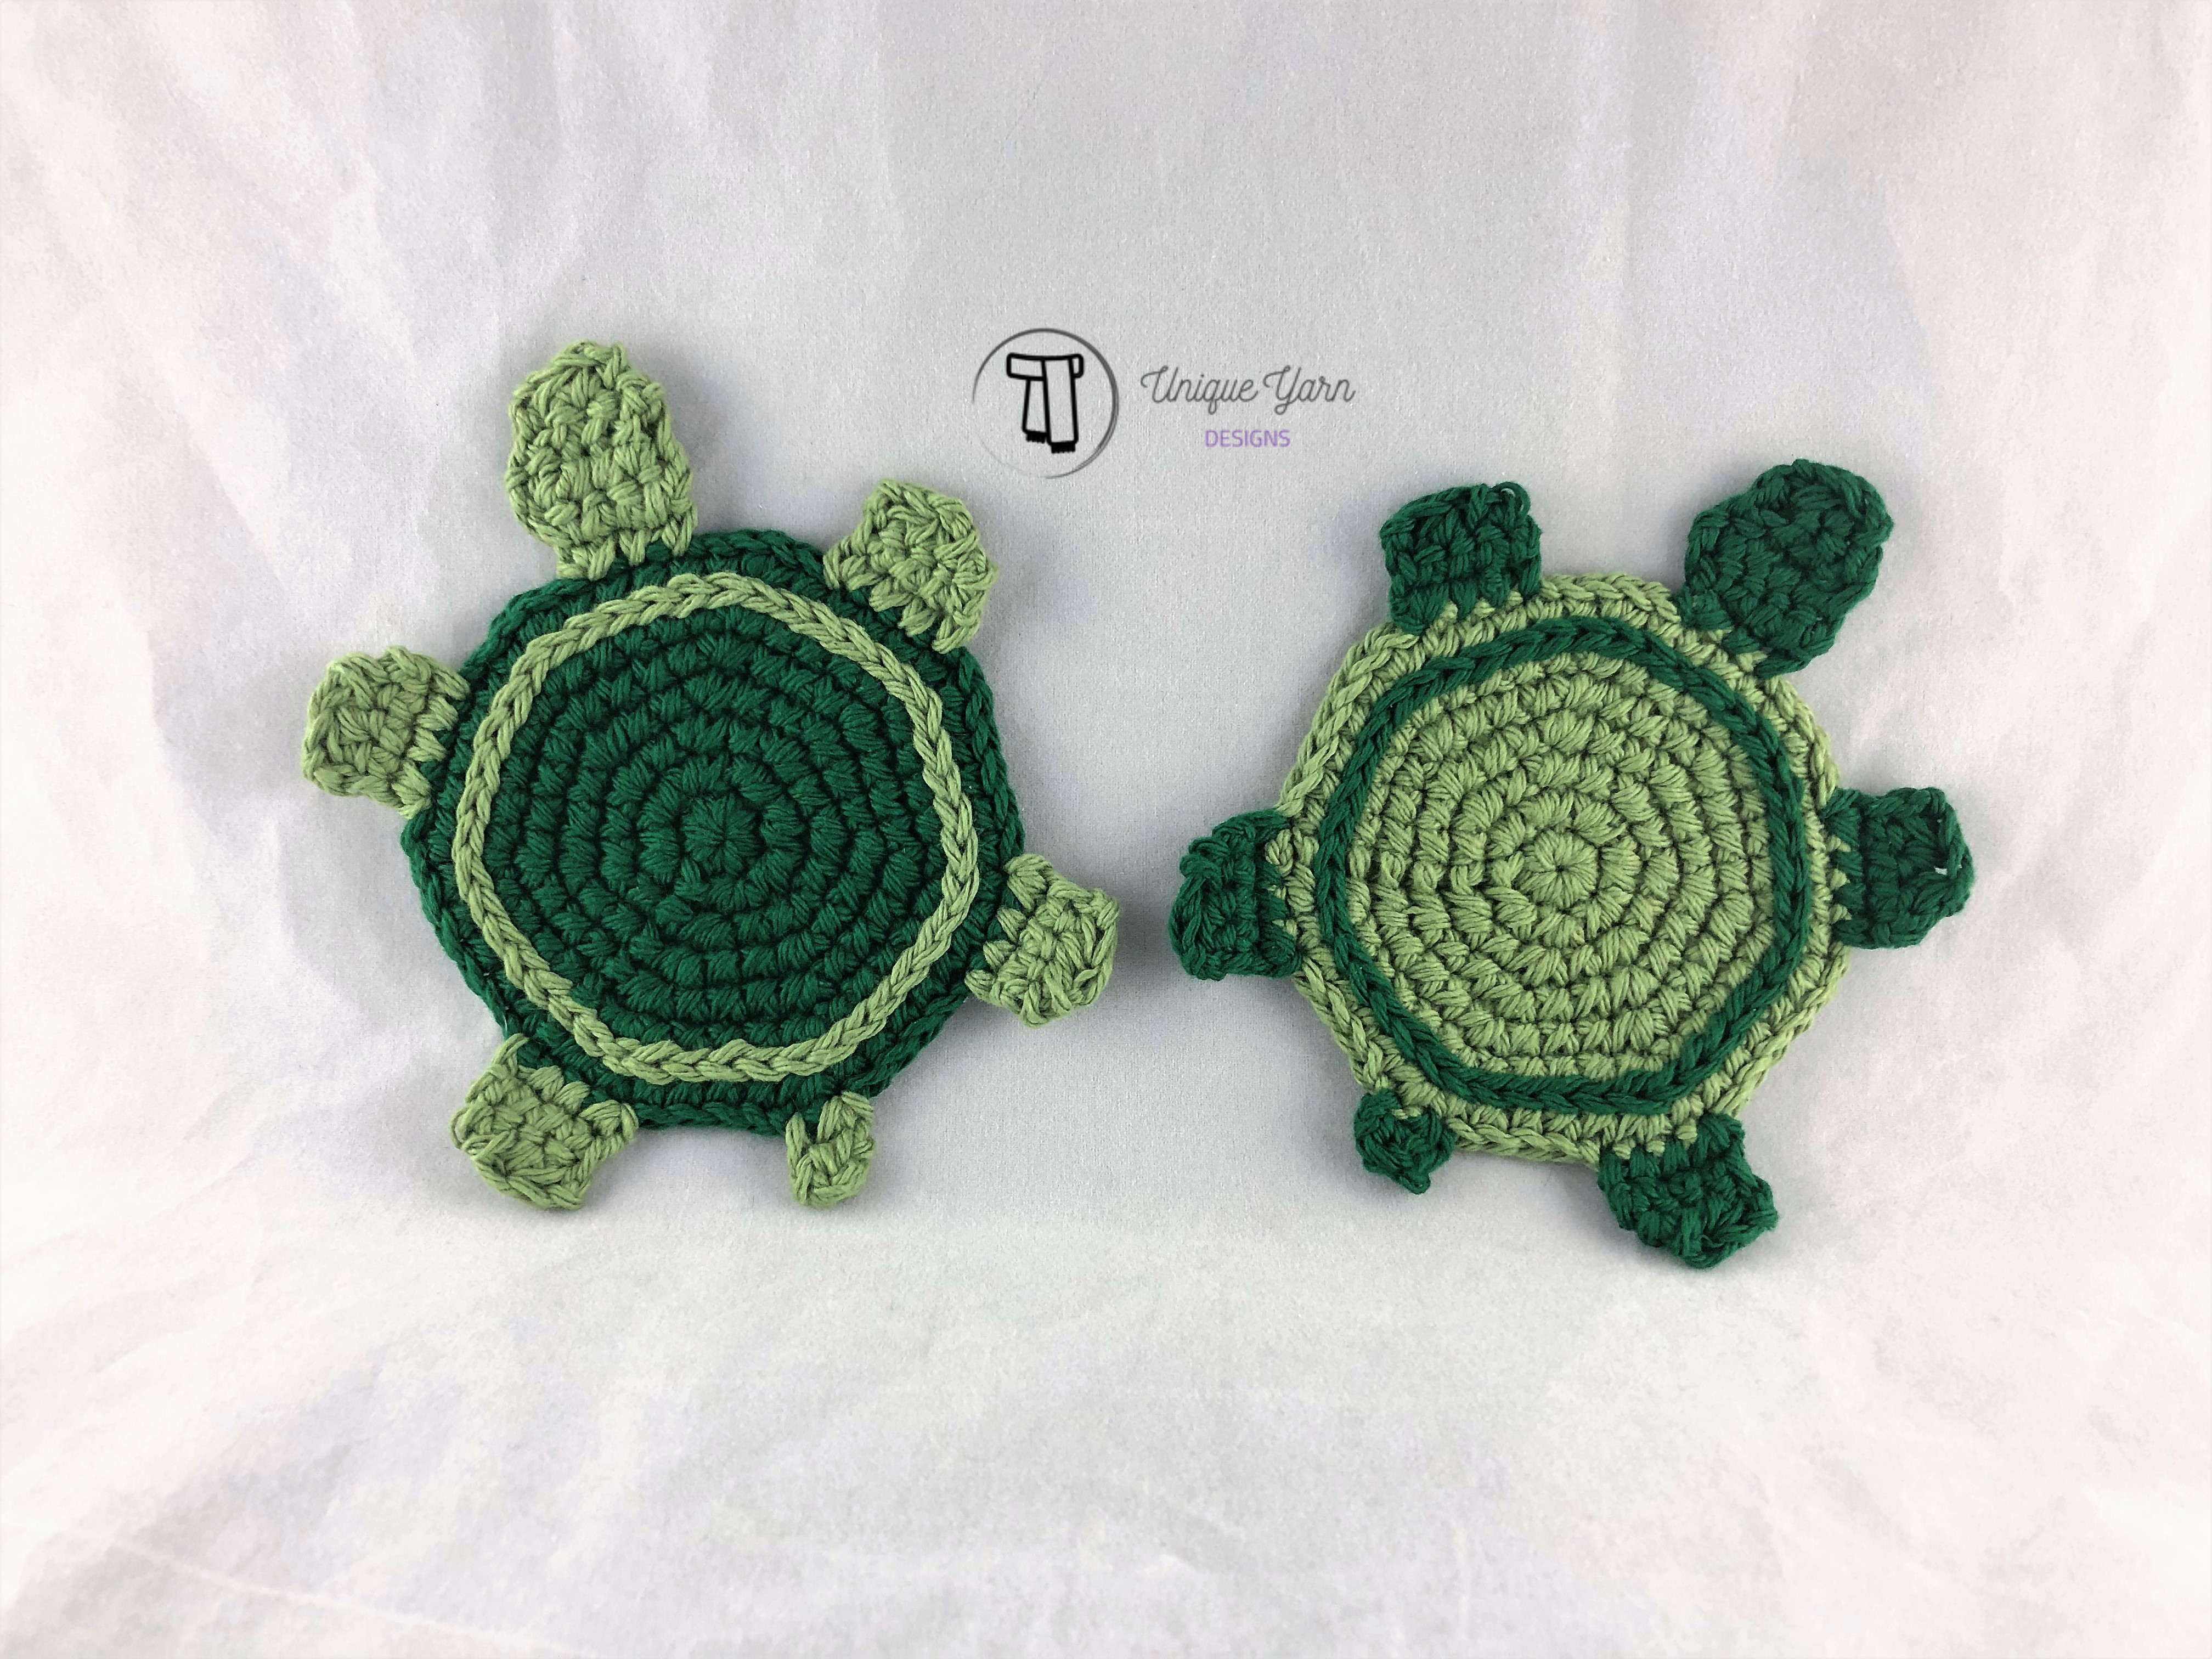
If you haven’t noticed the trend already, I love to make functional home decor items. The turtle coaster crochet pattern is inspired by my recent trip to the beach. Sea turtles are amazing creatures that live for over 100 years. This timeless turtle coaster will make an excellent addition to your own home or as a gift for someone else.
Let’s Get Started!
- Difficulty: Intermediate
- Materials:
- 4.5 mm crochet hook
- Yarn needle/ darning needle
- Peaches and Cream Yarn- forest green
- Lily Sugar n’ Cream Yarn- sage green
- 4.5 mm crochet hook
- Stitches used: chain, single crochet, slip stitch
- Other Techniques:
- Increasing and decreasing with single crochet
- single crochet increase: make two single crochets in the same stitch
- single crochet decrease: Insert hook into the first stitch, and pull up a loop (just like you normally would for a single crochet). Insert hook into the next stitch, and pull up a loop. Yarn over and pull through all three loops on the hook.
- Magic Ring (check out my post, linked here, on how to do this!)
- Slip stitch surface crochet (check out this great video tutorial from Repeat Crafter Me on how to do this)
- Abbreviations:
- ch- chain
- sc- single crochet
- sc dec- single crochet decrease
- sl st- slip stitch
- st- stitch
- Helpful Tip: Do NOT turn your work after a row/ round when making the shell of the turtle coaster.

Instructions: Turtle Coaster Crochet Pattern
First, make the shell of the turtle:
Round 1: In a magic ring, sc 7. sl st to first single crochet to join. (7 st)
Round 2: Ch 1. Make 2 sc in each of the next 7 st. Sl st in the first sc of round to join. (14 st)
Round 3: Ch 1. *Sc in the next st. Make 2 sc in the next st*. Repeat pattern between ** to end of round, ending with 2 sc in the last st. Sl st in the first sc of round to join. (21 st)
Round 4: Ch 1. *Sc in the next 2 st. Make 2 sc in the next st*. Repeat pattern between ** to end of round, ending with 2 sc in the last st. Sl st in the first sc of round to join. (28 st)
Round 5: Ch 1. *Sc in the next 3 st. Make 2 sc in the next st*. Repeat pattern between ** to end of round, ending with 2 sc in the last st. Sl st in the first sc of round to join. (35 st)
Round 6: Ch 1. *Sc in the next 4 st. Make 2 sc in the next st*. Repeat pattern between ** to end of round, ending with 2 sc in the last st. Sl st in the first sc of round to join. (42 st)
Round 7: Ch 1. *Sc in the next 4 st. Make 2 sc in the next st*. Repeat pattern between ** to end of round, ending with 2 sc in the last st. Sl st in the first sc of round to join. (49 st)
Fasten off, weave in the ends.
Surface slip stitch with a different color in-between rounds 6 and 7 all the way around the shell. Fasten off, weave in the ends. I pointed out where I did this in the photo below- I hope it helps!

Adding the Head, Feet, and Tail
In order to make sure that all pieces are even, start off with adding the head onto the shell. Take a look at the shell that you have made. There are seven points around the shell. We will make the head in between two of these points.
Head instructions:
Row 1: Counting clockwise from the sl st of the previous row, find the 15th single crochet from the previous row. Insert your hook into this stitch and pull up a loop with desired color for the head. Ch 1. Sc in the same st. Sc in the next two st. (3 st)
Row 2: Ch 1, turn. Sc in the next 3 st. Make 2 sc in the last st. (5 st)
Row 3: Ch 1, turn, sc in each st. (5 st)
Row 4: Ch 1, turn. Make a sc dec. Sc in the next st. Sc dec. (3 st)
Row 5: Ch 1, turn. Sc in each st. (3 st)
Fasten off, weave in the ends.
Tail instructions:
The tail is placed exactly opposite the head. This is worked in the two st at the end of the point opposite the head. If this isn’t clear on your shell, don’t worry! I’ve counted out the stitches below.
Row 1: From the last st of the head, count 23 st around the shell. Insert your hook into this stitch and pull up a loop. Ch 1. Sc in the same st. Sc in the next st. (2 st)
Row 2: Ch 1, turn. Sc dec. (1 st)
Fasten off, weave in the ends
Last but not least, the feet!
Now that you have the head and tail finished, placing the feet will be super easy. I am left handed and technically start the feet opposite of my fellow right- handers, so I will try to make these instructions as clear as possible:
The foot has a base of 4 sc. Look at the head and the tail. There will be four single crochet stitches in-between the edges of a foot and the head/ tail. See the picture below for a visual diagram.

The pattern for each foot is the same:
Row 1: Pull up a loop at the starting st of the foot. Ch 1. Sc in the same st. Sc in the next 3 st. (4 st)
Row 2: Ch 1, turn. Sc dec. Sc in the next 2 st. (3 st)
Fasten off, weave in the ends.
That’s all there is to it! You now have a super cute turtle coaster. What other color combinations will you use to make these?

Have questions about the turtle coaster crochet pattern? Comment below, contact me by email, or connect with me on social media! If you would like to make even more coasters, check out the Little Heart coaster pattern I released a few weeks ago.
I’d love to see a photo of your finished product! Post a picture on our Facebook Page or Tweet it to us @UniqueYarn
Copyright 2019 Unique Yarn Designs. This pattern may not be distributed in any way besides sharing the link to this post. Do not copy, and do not email unless it is the actual link. If products are made to sell, please add the link to this pattern in the description to give credit where credit is due. Thank you for respecting my work!


Leave a Reply