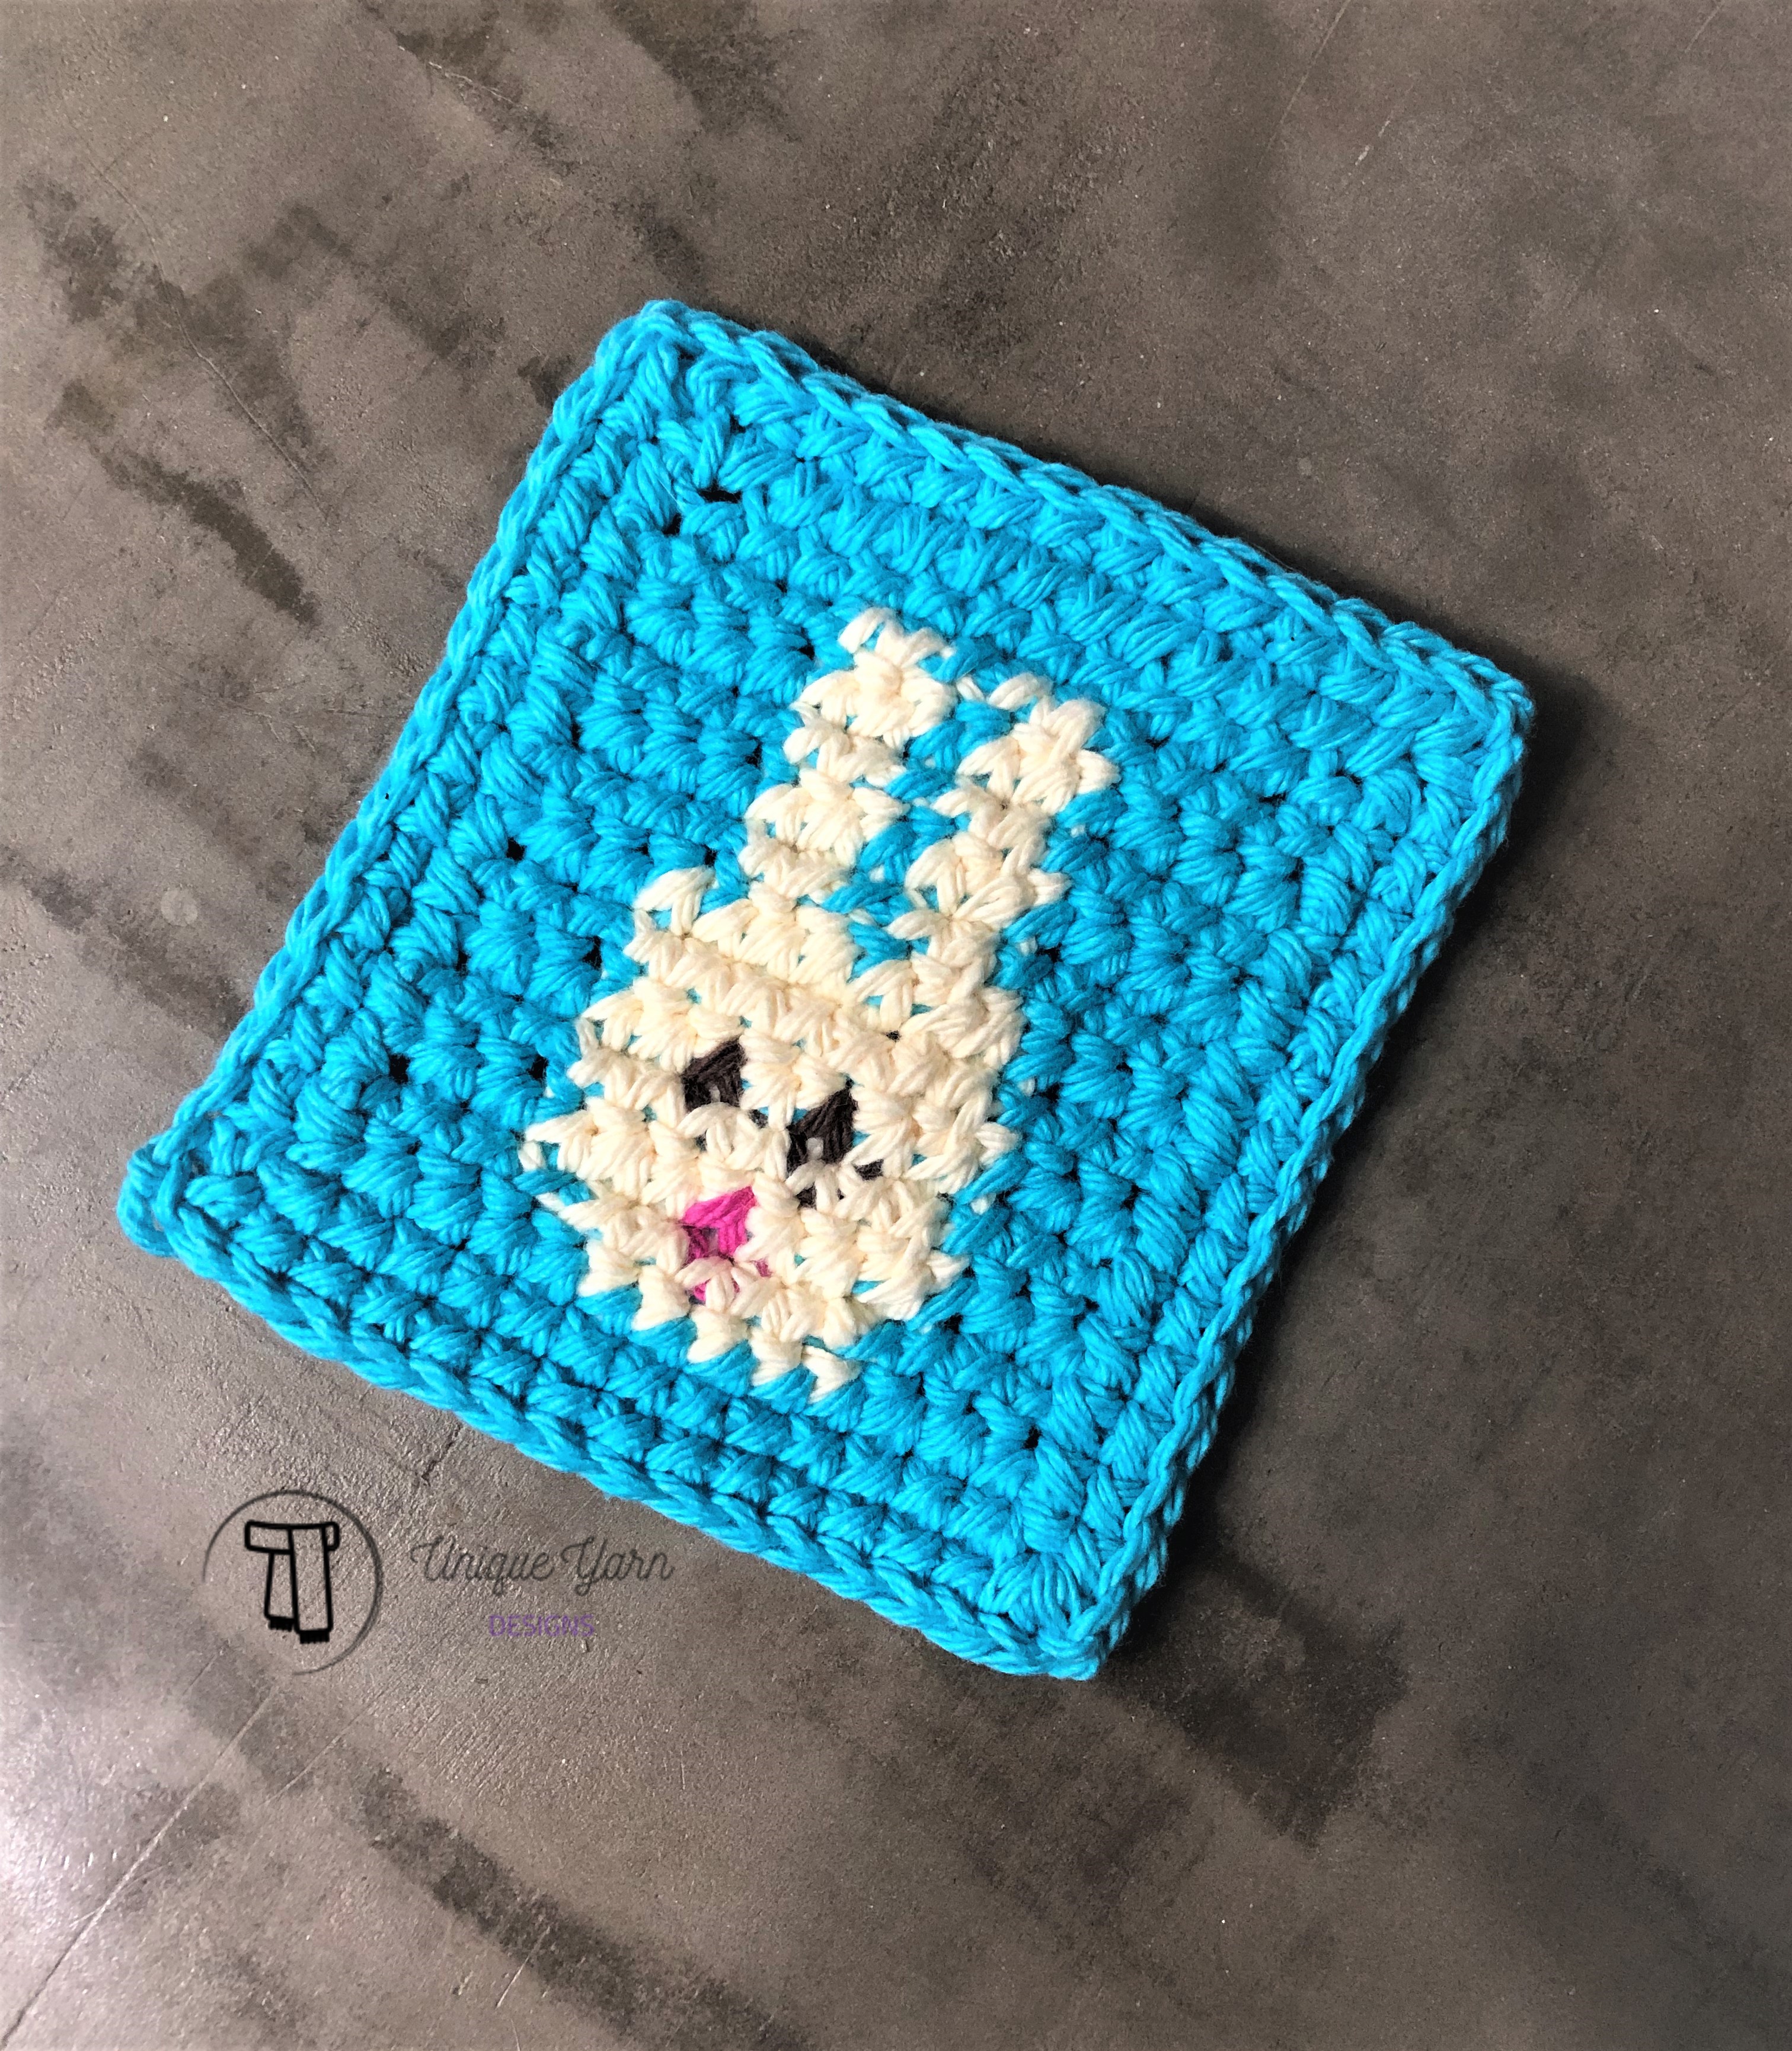
I am so excited to share the next coaster in the Easter coaster making series- the Little Bunny Easter Coaster! If you didn’t see the Baby Chick Easter Coaster, click this link to check it out.
This pattern is slightly annoying since there are single color changes for the eyes and nose- I try to avoid weaving in ends whenever possible. However, this one is super simple from a graph standpoint and should be fun to work through!
The next patterns in this mini Easter coaster series is an Easter egg and Easter basket. These coasters will make an excellent addition to your home decor this year and years to come. (Also, if you want to know what other posts have been planned for April, check out this most recent post with hints!)

Let’s Get Started!
- Difficulty: Easy
- Materials:
- 4.5 mm crochet hook
- Yarn needle/ darning needle
- Lily Sugar n’ Cream- Ecru
- Lily Sugar n’ Cream- Hot Blue
- Small amount of Lily Sugar n’ Cream in Terra Firma (brown) and Hot Pink for the eyes and nose
- Stitches used: chain, single crochet
- Other Techniques: color changing
- I have not created a tutorial for color changing, so I recommend this tutorial from another designer if you need help. Let me know if you have questions!
- Abbreviations:
- ch- chain
- sc- single crochet
- st- stitch
- Approximate size of finished coaster: 4″ x 4”
Tips Before Starting: No one likes to weave in a million pesky yarn ends from color changes! For this pattern, carry the Hot Blue through the Ecru parts instead of cutting after every row.
Instructions: Little Bunny Easter Coaster crochet pattern
Below is the graph for this pattern. This is a coaster made with single crochets, so each square on the graph is one single crochet stitch. In other words, this is 13 single crochets by 13 single crochets, and then we crochet a border around it.
I start graphs from the top left. The written instructions are written from the top, from left to right, and then continues row by row.
Odd rows: Work left to right
Even rows: Work right to left

Written Pattern: Little Bunny Easter Coaster
Here is the written pattern for the graph photo above. Refer to the graph as needed to confirm color placement is where it should be.
Row 1: With blue, ch 14. Sc in the second st from hook. Sc across. (13 st)
Row 2: Ch 1, turn. Sc in the next 4 st. Switch to ecru. Sc in the next 2 st. Switch to blue. Sc in the next st. Switch to ecru. Sc in the next 2 st. Switch to blue. Sc in the last 4 st. (13 st)
Row 3: Repeat Row 2. (13 st)
Row 4: Repeat Row 2. (13 st)
Row 5: Repeat Row 2. (13 st)
Row 6: Repeat Row 2. (13 st)
Row 7: Ch 1, turn. With blue, sc in the next 3 st. Switch to ecru. Sc in the next 7 st. Switch to blue. Sc in the last 3 st. (13 st)
Row 8: Repeat Row 7. (13 st)
Row 9: Ch 1, turn. With blue, sc in the next 3 st. Switch to ecru. Sc in the next 2 st. Switch to black. Sc in the next st. Switch to ecru. Sc in the next st. Switch to black. Sc in the next st. Switch to ecru. Sc in the next 2 st. Switch to blue. Sc in the last 3 st. (13 st)
Row 10: Repeat Row 7. (13 st)
Row 11: Ch 1, turn. Sc in the next 3 st with blue. Switch to ecru. Sc in the next 3 st. Switch to pink. Sc in the next st. Switch to ecru. Sc in the next 3 st. Switch to blue. Sc in the last 3 st. (13 st)
Row 12: Ch 1, turn. With blue, sc in the next 4 st. Switch to ecru. Sc in the next 5 st. Switch to blue. Sc in the last 4 st. (13 st)
Row 13: Ch 1, turn. Sc across in blue. (13 st)
Making the Edge
I like to have a finished edge on all my projects, so I did a basic sc around the edge, making 3 sc in the corners. Do this twice.
Have questions about the Little Bunny Easter Coaster crochet pattern? Comment below, contact me by email, or connect with me on social media!

That’s the end of the Little Bunny Coaster crochet pattern! Click the images below to check out other graph patterns I have made!


I’d love to see a photo of your finished product! Post a picture on our Facebook Page or Tweet it to us @UniqueYarn
Copyright 2019 Unique Yarn Designs. This pattern may not be distributed in any way besides sharing the link to this post. Do not copy, and do not email unless it is the actual link. If products are made to sell, please add the link to this pattern in the description to give credit where credit is due. Thank you for respecting my work!


Leave a Reply